by
by Ever get curious about those smooth and silky almost-unreal shots of waterfalls, night stars, or city lights? Ever get envious of how perfect they are clicked?
Well, don’t be because we have brought you the easiest hack for shooting such a magnificent shot. You might be thinking of some advanced photoshop tricks, but no, it’s just a simple yet artistic camera shooting technique: Long Exposure Photography.
The ultra-powerful long exposure filming has the potential of creating a magical and dreamy picture which is done by using the slowest shutter speed. It’s the fascinating genre of filming that can book all your attention.
So, whether you already know this technique or just read it, if you are willing to master it, you are at the right place. Join the party, and let’s dig into the in-depth guide to long-exposure photography.
This Post Contains
What is long-exposure photography?
Long Exposure photography is the most creative way of trapping your imagination in the frame. With the help of long exposure (justifiable from the name) and the highest reduction in the shutter speed, the camera can grant you the power to shoot dreamy-like footage blurring the moving element in the frame, which also gives an unrealistic effect and impressive impression.
This long exposure photography allows you to shoot a few minutes, maybe an extra scene within one image, stating capturing the photo of a moment you can stick to taking one photo over time by transforming the motion in that picture into a magical artistic vision (such as moving clouds, sea waves or running vehicles)
This whole thing can be possible as you manage to keep the camera shutter open for a relatively longest time. There is a certain pattern followed by long exposure shooting to manage such an out-of-the-world shot.
To capture handheld images, you need to follow the rule of thumb. The rule of thumb states that the shutter speed will always be lower than the equivalent focal length of your lens.
Shooting Long Exposure photos in daylight
Experimenting with long-exposure shooting in the daylight can be super fun with better lighting and clarity.
The best reason to shoot long exposure at night-
- Capture motion clearly with adequate lighting
- Increased smoothness and clarity of the image
- The undesirable element can be removed
- The fastest-moving obstacle can be utterly invisible.
Shooting Long Exposure photos at night
Night-lighting shooting plays a significant role in long-exposure shooting with precise details and more creativity.
The best reason to shoot long exposure at night-
- Capture as much as light through the sensor
- Get a better display of bright stars during astrophotography
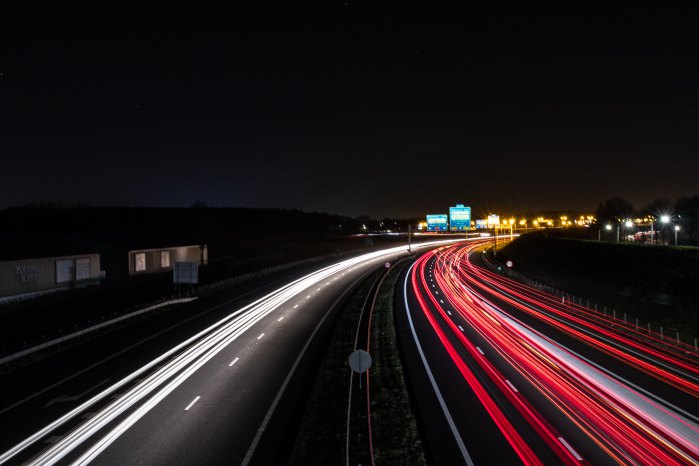
- Capture delightful artificial light trail and their motion
- Capture more precise details at night in the foreground.

Shooting Long Exposure photos
Implement your idea of shooting creativity of long-exposure photos by following the simplest steps to shoot. Here are the in-depth details about shooting long-exposure photos.
Gathering Equipment – Before getting into the whole shooting game, you must gather a few necessary pieces of equipment along.
Advanced camera with manual functioning – You will need an advanced camera with the highest pixel and basic requirement of the manual function. This means you can adjust the camera setting(ISO, aperture, speed) manually.
Camera lenses– Long exposure shooting is a creative form of photography; choose the camera lens wisely. Pick only those with relevant potential.
- Wide-angle– The one with the potential of inching vast coverage
- Telephoto– The one that can frame the subject standing at the farthest distance
- Mid-range – The ideal combination of wide-angle and telephoto lenses.
Tripod or gimbal – An essential stabilization tool for maintaining balance and reducing camera shakiness. These tools could be either a gimbal or a durable tripod.
ND filter– ND filter or the Natural Density filter is essential; that mounts on the lens and filters the amount of light reaching the shutter. This is needed because with the lower light reaching, the slower shutter speed can be achieved.
Shutter Release– A rare yet crucial tool you need to carry is the remote shutter release. It allows shutting the camera shutter without manually pressing it, reducing the vibration caused by a physical hand.
Picking Subject – Before going straight to exploring expertise in long-exposure shooting, you need to be assured of what you will be shooting in the frame. In short, pick the subject.
- Astrophotography– The bright stars and milky sky with filled stars
- Sea or River – water bodies with the playful moving waves
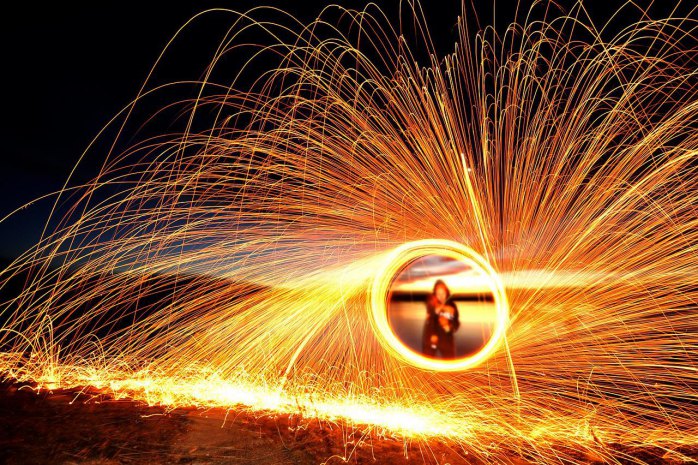
- Light painting – Lighting from any moving vehicle in city traffic
- Waterfall – Thundering snowy running waterfalls
- Clouds– Buttery, the dreamy and heavenly vision of clouds
- Firework – Colorful bright lights of fireworks
- Lighting– The roaring lighting bolt
- Park rides– fast-moving exciting amusement park rides
- Trails– Making stars, Ferris wheels, or moving car trails
Essential Camera settings
Along with the series of steps, you might need to follow the basic camera setting.
Shutter speed– calculation of shutter speed will be different for every shooting scenario. This will be needed to evaluate on the basis of how fast the subject is moving and not ignore the ND filter engagement during calculating.
Manual/ Aperture priority mode– The very first step is to switch your camera to the manual mode or even the bulb mode if supported.
Histogram Activation– You will need to activate the histogram review to determine the correct range of aperture, exposure, and ISO stuff; For cross-checking the final result.
Metering– Switch on to the Matrix mode, the most common metering mode, to emphasize a little on where, when, and how the camera is focusing.
Turn off stabilization– you need to switch off the in-built stabilization so that the lens will not compensate for any movement or try to blur the frame.
Bulb Mode – The special bulb mode came in-built into some advanced cameras; this will allow you to shoot long exposure shots for more than 30 seconds, for the longest period.
Steps to shoot
Once you have gathered your equipment and chosen the subject for shooting, the next thing is to perform the action. Follow these steps
Plan shoot– Pre-planned the shooting in advance; keep track of style, theme, and subject and mentally note down the workflow. Also, do not forget to visit the location in advance to get an idea of the implementation.
Determine whether- Do not forget to check the weather, cloudy, flat blue skies, overcast horizon, or rain; you need to be well-known before shooting.
Configure time– Remember long exposure shots are the magic of time and motion, so plan your shot to its ideal time. you can try shooting in daylight
- At Sunrise
- At sunset
- Golden hour (before sunset or after sunrise)
- Blue hour (twilight)
- During Eclipse
- Study Weather
Check on Equipment– Professional never forgets to bring any equipment, so check on all of your tools; Keeps their battery charged, and also carries additional pairs of batteries to avoid interruption.
Set Focus– Setting the focus might be tricky; let your camera try autofocusing; if you feel the AF can be a trusted and reliable source, lock the AF and prevent it from refocusing; otherwise, switch to the manual focus.
Set Exposure– Next will be the exposure setting; you can either tap into the manual mode for shooting at the exposure range for up to 30 seconds. But if your camera has the bulb mode, go with that for shooting beyond and lock the exposure with Auto Exposure lock.
Add ISO– Now set the ISO range of the camera to the native ISO, which is either ISO 100 or ISO 200. You need to also set the aperture with adequate landscape F-stop ideally to F/8 or F/11
Add ND filter– Now, you can add the ND filter to the camera, but remember, if you are shooting during the night in the dark, you probably don’t need them.
Set stability equipment– Once you are done with the settings and equipment attaching; mount the camera on the stabilizer (tripod or gimbal)
Calculate shutter speed– Almost done, now check on the shutter speed and set the perfect shutter speed manually. This speed can be calculated involving the ND filter ( Including means decreasing the speed by N stop, N stop of the filter)
Shoot RAW– Now, finally get to the main and get the long exposure shot; this needs to be done by keeping your hand steady, preventing camera shake, and getting a firm hold of the shutter release.
Check Histogram– Once the image is hot, verify the final result by analyzing the accurate focusing and exposure through the histogram, and start again.
Post-production doing
Tune into the editing part; Few actions to perform after the production of imagery; All of this trouble can be rectified by any paid photo editing software. Use them and bring professional finishing.
White Balance– check on the slight tint appearance on the picture caused by the disturbing white balance setting.
Stain makeover– Sometimes longest shutter hold during long exposure photography leaves a certain stain on the frame; you can demolish them in this process
Sharpness– check on the sharpness level of every shot; do not push the sharpness level to the highest and keep the smoothing level maintained.
Noise correction– If you have activated the noise reduction, it’s wonderful; if not, the appearance of noise will be eliminated in this process.
Final Words
No more assumption or disbelief that long-exposure photography is one of the most complex techniques and is difficult to learn; with the right set of equipment, deep insight, and consistency in practice, you can also create those magical-looking ethereal soft, and silky shots.
While we tried harder to cover everything, this article only gets to the detail of Long-exposure photography and its aspects, but that is enough for impeccable photography.
Mastering long-exposure photography is a matter of trial, error, and repeat, so you might need to put effort into making it your daily shooting routine.
Well, no one can become a conqueror just by reading the book, so grab your camera and kit, and experience the photography a little differently this time, with the long exposure technique. Good luck with your creative creation.