Shooting with a modern camera has not only given the perk of framing real adventure with a more realistic aspect, but it gave freedom to experiment with a more artistic approach tuning in creativity.
The modernity of the camera has the potential to modify the aperture, ISO, and other settings to showcase a unique exposure combination for a clear and sharp imagery streak.
There come the exposure compensation settings, a highly beneficial, rarely known, and immensely fruitful feature of digital cameras.
The prominent sets of steps that allow you to modify and implement the exposure setting in order to prevent your image from getting too dark or too bright are what exposure compensation does.
But before you can get into more beneficial details of this extraordinary feature, let’s dig a little, including what it does and its grant so much, and how you can utilize its creativity.
This Post Contains
What is Exposure Compensation?
Basically, Exposure Compensation is the technique that has the authority to override or master the exposure settings of your camera.
In simple words, it’s the convenient yet creative feature that allows you to minimize or maximize the exposure value while shooting different light-conditioned scenarios.
It’s a manual override, which means it has to be done manually, controlling what your camera’s light meter has picked.
For the stabilized and relevant amount of exposure in your frame, one must be aware of using this special exposure compensation feature and alter the predicted exposure value chosen by the camera to set it right.
The simplest fact to keep in mind is that exposure compensation is no different from setting exposure manually or using an exposure lock to make the right decision. It has the basis of granting you the power to adjust your camera’s exposure settings through a certain number of stops.
The right exposure in the range makes sure that the possibility of appearing shadows and highlights is reduced to minimal. The common exposure compensation stops are -1, -1/3, 0, +1/3, 1
Apart from the valid theory of managing the exposure level in an image, these Exposure compensators work by enhancing the image quality. Few of their recorded benefits are
- It keeps the photos from getting too dark or too bright
- It saves a lot of time spent in post-production editing
- These are intended to keep the precise and essential details
- It manages the image sharpness and prevents them from appearing noisy
- It deals with the unnecessary highlights and shadows disturbing the image.
- It indulges creative effects like exposing or highlighting the details
How to Find Exposure Compensation in your camera
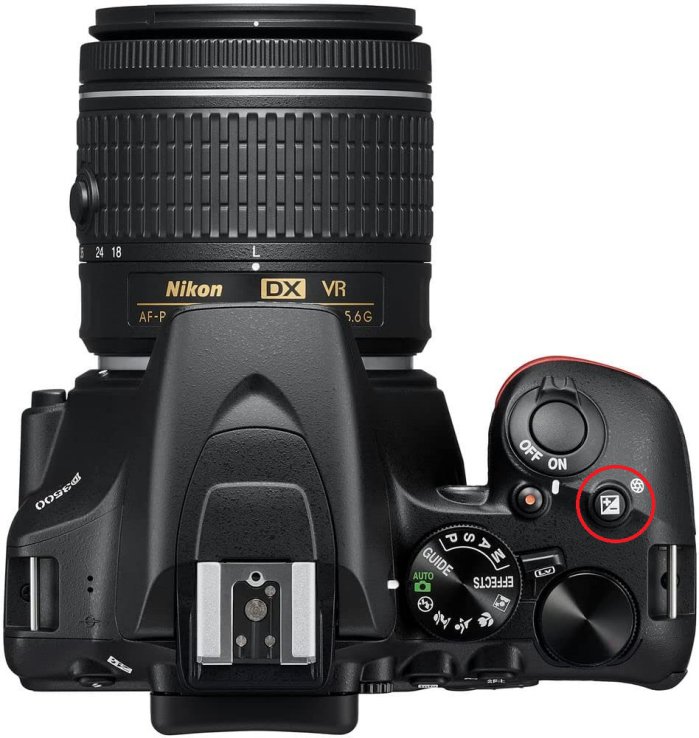
Some cameras have the exposure compensation scale at the main interface, while some have it on the top LCD screen display. Sometimes it appears only as a dial on top of the camera, which can eventually appear or be an on-screen control in the menu setting on digital cameras.
The exposure compensation can be initiated by the camera mode or scene mode. Now, if the scenario is darkest, it means you need to enhance the exposure with the positive number (+EV or +1/3) on the dial.
The same things go in the bright scene; if you need it to be the brightest, then you need to turn the dial to a negative number (- EV or -1/3). Some of the advanced DSLRs also have this large exposure compensation inside the viewfinder, like the scale with the +, – sign on both ends and 0 in the middle.
How does Exposure Compensation work in the image?
Normally, the regular camera works by setting the exposure through the light meter, which does the job of evaluating the amount of light reflection on your subject, Which is why sometimes the area in the frame is left darkest or lightest.
Exposure compensation tackles that very trouble. It basically works by adjusting either the aperture or shutter speed or sometimes both to get the exact result.
Exposure compensation is not a big deal for the person shooting in manual mode because it doesn’t affect your filming the same way with its own manual controls.
But the fascinating part is it can easily work with semi-auto mode, too, specifically in aperture priority, shutter priority mode or program mode.
When to use Exposure compensation during filming
After knowing the worth of Exposure compensation, you must be curious about when to implement them in photography. There are numerous situations that state the requirement of exposure compensation. Some of the noticed exposure compensation required scenarios are
Direct Sunlight– When you shoot under direct sunlight, you will notice that the subject in the center of the frame is a little backlit. You can improve that with exposure compensation by clarifying more details on the subject.
High-lit surroundings – Sometimes, while shooting the scene with an immense amount of brightness, you will notice the faded details of the whole surrounding. You can use this to darken your subject.
Low-lit surroundings– Similarly, when the scene in your frame appears to be dark, you can use this amazing feature to bring the exposure to a high level, lighting the surrounding of the frame.
Everyday– Not just that, you can practice and implement exposure compensation in everyday usage. You notice the irrelevant amount of lighting in your frame and go for it.

How is the Exposure compensation measured?
Usually, Light is measured in the different stops of lights or in exposure value (called EV).
The cameras offer an exposure compensation value ranging from the highest positive EV to the lowest negative EV. The common range offered by the cameras is +3EV to -3EV, which means the user gets plenty of control ranging in between.
Some of the advanced cameras also have -5EV to +5EV.
How to use Exposure compensation step-by-step?
Using the exposure compensation for a more fruitful and reliable result should be performed in certain steps.
Setting the camera– First thing first, before you start, you need to check whether your camera is set or not In a certain essential mode. Make sure you are shooting in auto mode. If you are using the manual mode, set the auto ISO.
Tuning in to the semi-auto mode– Now, the second step will be to set your mode dial to either aperture priority, shutter priority, or program mode.
Evolution– The next and more crucial step is to determine the scenario and evaluate how much compensation will be needed. For the darkest and brightest frame, the enhancement or reduction by two stops is ideal, while with the moderate range of changes, you can choose one stop accordingly.
Locate– once you figure out how much exposure compensation you will be required in your frame, look out for the main dial and turn it to whichever side the previous evolution states.
Shoot– Now you are all set to go; the camera settings check, the exposure compensation check, just go ahead and take the shot, review, and check the histogram. If it doesn’t match your expectations, repeat the process from step 3.
Exposure compensation in a different mode
As we mentioned, Exposure compensation works in certain definite modes. There are three majors of them Aperture Priority called Av; Shutter Priority called TV, and Programmed mode.
Once the mode is selected, It starts embracing its magic around wise working in a different technique. Let’s study the working of exposure compensation in different modes more precisely.
Aperture Priority Mode– The aperture priority mode, as you know, allows you to choose the aperture yourself while the camera tunes into the additional exposure settings. The exposure compensation in Aperture priority mode only adjusts the shutter speed setting and manages your exposure level. In short, the aperture and ISO setting stay the same while the shutter speed changes as required in this mode.
Program Mode– the exposure compensation in the program mode acts according to the camera. In this mode, it adjusts both the aperture and shutter speed to slay the better-exposed result. It sometimes just goes into adjusting all of the exposure settings if required. This considerably is a convenient and hassle-free mode for Exposure compensation.
Shutter Priority Mode– Similarly, in shutter priority mode, you get to choose the shutter speed while the camera gives the rest. The exposure compensation in Shutter priority mode modifies the aperture to expose light or darken the surrounding in the image. Simplifying, the ISO and shutter speed stay put in this while the aperture is modified as per needed.
Manual Mode– This is rare, know that Exposure compensation doesn’t work in manual mode, but some of the cameras do have this. In such a case, the aperture and shutter speed need to be fixed while the ISO is set to be Auto.
Final Words
Exposure compensation is quite the deal. Playing with the aperture, lighting, and sharpness is something that can take your photography skills to the next level. But you know how to do it, masterly. Which we hope you do now.
The aperture priority mode, shutter priority mode, and much more of exposing light to the camera in a relevant amount can magnify the charm of your photography skill.
Not only that, you can learn to deal with shadows or unnecessary highlights and keep your imagery away from the eye-eye of distortion. Fascinating, isn’t it?
Taking control of exposure is much synonymous with taking the power of creating an artistic exception. This is the key secret of professional photographers who are famed for their wonderfully flawless and clear pictures. So what you are waiting for, start shooting and slaying with your shooting.


