 by
by It’s not just the camera and camera lenses that ensure the image quality; there are a few significant factors one should consider if they are wandering for impeccable sharpness and correctness in pictures.
Chromatic Aberration is a dominant quality reducer, which can be stated as color fringing, that only aims to destroy the quality of your pictures.
Thanks to the research team, there are a few easiest ways to deal with chromatic aberration; color neutrality and rendering can be relatively stable with these methods.
In this article, we have thrown an insightful light on the topic, like what are aberration causes, its different types, and how you can prevent or fix them in your photos.
So wait no more; let’s get started with this, and by the time you have finished, you’ll be a chromatic aberration expert.
This Post Contains
What is Chromatic Aberration?
Chromatic Aberration is majorly the failure of a lens that couldn’t be balanced, focusing all colors at the same point. Chromatic Aberration is the color-fringing effect that usually forms in the high-contrast areas of your photos.
It is one of the most common troubles faced by regular photographers, which is caused when the color in the frame is incorrectly bent.
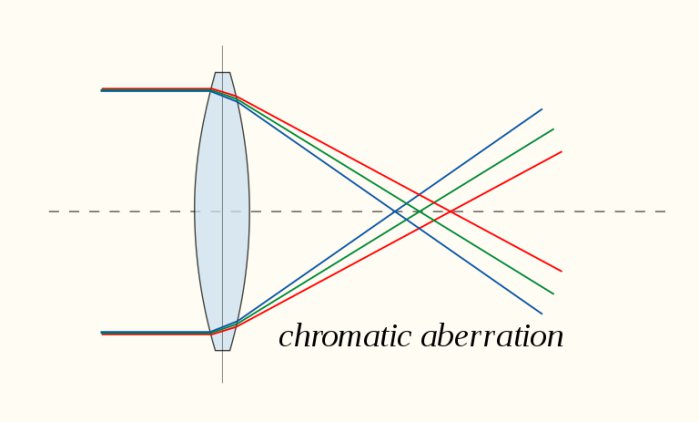
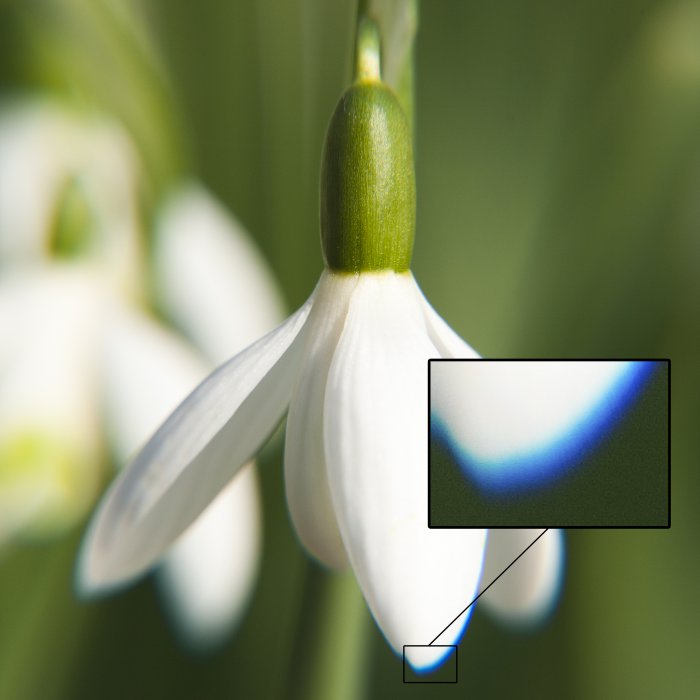
In simplest terms, Chromatic Aberration is an outline of unwanted color drawn along the subject’s edges in photographs.
Chromatic Aberration is also termed chromatic distortion, spherochromatism, color fringing, or dispersion. It can distractedly reflect weird color fringes and artifacts to your image, reducing its quality.
This determinedly happens because of dispersion at the phenomenon where white light emerges into different colors. They can appear unintentionally along the metallic surface in high-contrast space.
Stating the fact that the lens is potent enough to focus the wavelengths of color caught in the scenario equally at one point won’t get affected with the chromatic aberration or fringing.
But the different color of light enters and hits the sensor with different speed and angle which dominate the aberration in the image. These can happen due to the wrong aperture you choose, your lens’s physical appearance, and the light intensity.
Impact of chromatic Aberration
Chromatic Aberration might be a common problem, but it can affect the image with some severe quality-related effects. Some of the major impacts subjected due to chromatic aberration are
Lens Dispersion– It is also called dispersion of lens; when the different wavelengths of color hit the lens at different speeds and angles, it can create either a blurry or visible unnecessary border around the subject
Visible colors– Due to the chromatic aberration, the image sometimes faces unwanted red, green, blue, purple, yellow, and magenta margin around the object.
Frame Edge– Selectively, colors like purple fringing can appear on the frame edge, spoiling the image’s sharpness
Soft Edges– It also softens the image, the margin around, and the color and ultimately give soft edges look
Know the causes
Hence, you have concluded that chromatic aberration is color disruption; a resultant imperfection occurs when a lens fails to focus all wavelengths of color to the same point on the focal plane.
The lens here functions as a prism, similar to a triangle-shaped prism. They bend light, and color passing through the lens is refracted at a different angle.
Since the light is made up of wavelengths (specified as color), the camera’s sensor can detect them vividly. The lens has the responsibility of making sure that all of the wavelengths of a particular ray fall on the same spot on the sensor.
It would be straightforwardly effortless when they all fall in the same place, but when different wavelength (different color) strike the lens, they simultaneously hit the sensor with different speed and angle (some falls back, while some fall forwards the focal plane) this all causes the chromatic aberration.
Other than the technical theory, some of the basic, keep-in-mind causes of chromatic aberration are
- Cheap lenses– Cheap price of the lens doesn’t offer the best material, intuitive performance, and responsive focal plane resulting in low quality and fringing trouble.
- Aperture – Shooting your image with the widest opened aperture might be the worst for fringing.
- Zoom– The widest-angle lens with zooming range managing feature likely led to chromatic aberration.
- High-contrast– an image with the highest contrast at the edge or even a long edge can get affected.
- Attention– Not paying attention to focal length and composition during or post-shooting can get you fringing.
What are the different types of Chromatic Aberration?
As you know, Lights get refracted separately whenever passing through the lens. If it coincides directly with the focal length at the same point, there won’t be any hassle; but if the light falls behind or before the focal length, chromatic aberration occurs.
So referring to the wavelength dispersion on other separate planes, chromatic aberration is differentiated into two major categories.
Longitude (Axial) Chromatic Aberration
The most common Longitude or Axial Chromatic Aberration can be caused when the color wavelength does not meet at the same point after passing through the lens. These can also signify “LoCA” or “Bokeh Fringing,” and these can be stopped by stopping down the lens.
Located– This can be located if your subject shows the color fringing throughout the image, specifically in the center. They can appear as green, red, blue, or all of them around the subject throughout the image.
Latitude (Transverse) Chromatic Aberration
The lateral or Transverse chromatic Aberration can be caused when the light wavelength is bent and then pass through the lens at a certain angle and then refocused in a different place along a focal plane or when the different wavelength comes at an angle focused at a different position along the same focal plane and refocused back.
Locates– This type of aberration can be easily detected because of its blurring effect at the corner of the image, the highly contrasted image. They do not appear in the center portion of the image.
How to avoid Chromatic Aberration?
There is no perfect camera or lens, and post-production image editing can be hectic, so here’s what you will do during shooting to avoid chromatic aberration.
High contrast– The easiest way is to avoid the high-contrast shooting area. When shooting a scene with immense contrast, chromatic aberration actively peaks its way into your image.
Focal length – Always keep your focal length in the middle; the widest and extreme longest range of focal length attracts more aberration effect.
Aperture reduction– Using a narrow aperture can do the job; sometimes, playing with the aperture and minimizing its value repairs the lens faults, including aberration.
Subject distance– The Edges in the frame are usually associated with an intense chromatic aberration effect, so always keep your subject close to the center and get rid of its toxicity.
Focal plane– People recorded extreme chromatic aberration at the shortest focal length, like 15mm, so to prevent such encounters shoot above 30mm.
Shooting in RAW– Instead of shooting JPEG, try shooting RAW because they have the largest metadata of the image, so they won’t be malleable in editing to remove chromatic aberration.
Camera with an in-built solution– You can use the modern camera with a built-in correction feature and let your camera process the image with minimal fringing.
Lens– Some lens-related points you need to consider to avoid chromatic aberration.
Low dispersion glass element- use lenses with low-dispersion glasses; these glasses are in-built to minimize chromatic aberration.
High-Quality– The high-quality lenses are potent to provide your image with minimal chromatic aberration. They are fast and intuitive lenses.
Achromatic lens– Achromatic lenses have a natural tendency to correct two concentrated wavelengths on the same plane through two separate glass lenses with varying degrees of dispersion. Use such lenses to avoid trouble.
How to fix the image with the Chromatic Aberration?
Even with all these significant precautions, if your image gets caught up with the chromatic Aberration slight effect, you don’t have to worry a bit. The effect of chromatic aberration can be removed using any fully-featured image-editing software.
Exclusive image-editing software like lightroom provides two different options to correct the chromatic aberration one effortlessly automatic and the second intuitively manual.
Auto
- In Lightroom, open any photo with fringing in develop tab
- Click on the Lens correction options under the menu section
- Again, click on the Profile section with two boxes to remove chromatic aberration and enable profile correction
- Click the remove chromatic aberration button
- And it’s done
Manual
- Once again, in lightroom, open an image with trouble in develop tab
- Expand the menu and click on the lens correction
- Click on the manual under correction expansion
- Under the manual option, go with the Defringe tool
- Now you have to use the eye-dropped or Fringe color selector tool at the affected area of fringing
- You can use a manual slider to control hues during the process.
Summing up
Who doesn’t want a crisp, clear, sharp image with the proper color neutrality and disruption? Chromatic Aberration is the key factor that can’t let happen easily.
But now that you know what they are and how to get rid of them easily, you won’t be facing any image quality trouble even with aberration references.
But remember, chromatic aberration can also be used as a good thing; they have the competency of creating something creative and catch-the-attention type.
At this point, you should know almost every inch about chromatic aberration; you must also be familiar with its prevention and fixing on both during and post-shooting scales.
So take a moment of comfort that they cannot tarnish your beautiful dedicated piece of work. You can use dominance and control them however you want. Go ahead and try implementing this theory in practice and slay high-quality imagery shooting.