 by
by Shooting pro-leveled pictures at the easiest are tied up with numerous secret tips and hacks; the shooting manual is one of them, Which is true but not in every case.
Some significant settings of digital cameras always ask for automaticity, such settings like exposure or ISO. Shooting in manual mode can be really hectic and time-taking if you are a regular photographer, but the developing era of digitality makes everything smooth and easy.
Easy like Auto ISO, a magical setting that corrects the image exposing to light automatically without human involvement. It can be really beneficial to the moment when you don’t get time to respond to sudden lighting changes surrounding.
Let’s get a better insight into Auto ISO, how it works, when, and how it should be implemented.
This Post Contains
Know the ISO
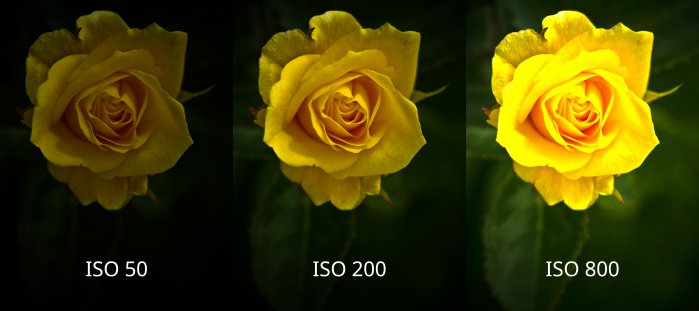
ISO is one of the essential variables of the exposure triangle; it generally measures and modifies the sensitivity of the sensor to the incoming light.
Take it like that, the higher the ISO is, the more sensor will be sensitive to light, while the lower the ISO will be, the lesser sensor will be sensitive to light. Despite other exposure triangle factors, the Higher ISO in the image exposes lighter, and the lower ISO in the image justifies darkness.
Not just that, ISO is also responsible for image quality, color contrast, sharpness, and much more. Common ISO ranges are ISO 50, ISO 100 at the minimal, and ISO 6400 at the maximal.
What is Auto ISO
Auto ISO is the most amazingly fruitful feature that grants the camera freedom to pick an adequate ISO for each slot on its own. It is a more convenient and creative way of controlling the incoming light amount in the image automatically while you focus on capturing the sharpest view of the subject.
It allows you to smoothly enhance your flexibility during the shooting. This whole thing works out when the camera chooses the largest aperture or shutter speed at first (depending on the different modes), then the auto ISO selects a range of ISO values for exposing the appropriate amount of light in the images.
Auto ISO can be used in either Aperture priority, shutter priority, Manual, or programmed mode, but its quiet expertise works impeccably in the shutter priority mode.
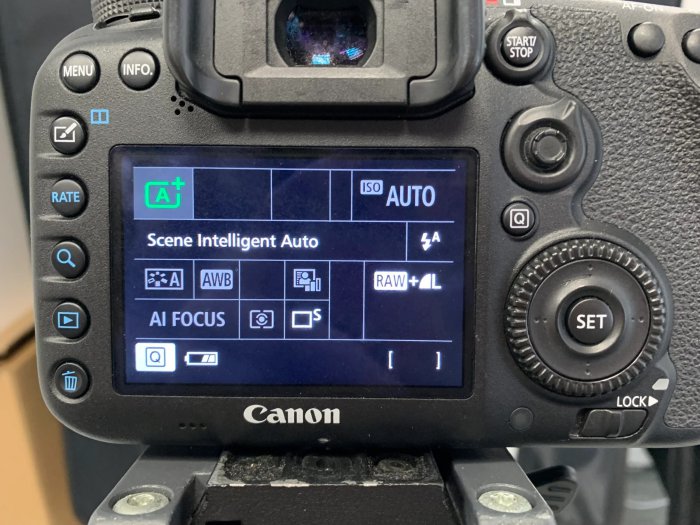
Auto ISO can easily locate under the camera’s ISO sensitivity setting section, or in some cameras, it just lies under the shooting setting as in “Auto ISO sensitivity control.”
Why should one use Auto ISO?
Auto ISO is the relevant definition of development launched under the digital revolution that has the power to choose the right sensitivity, the more adequate ISO number will lead us to the right exposure in the image.
It can be used while shooting any photography style; its main agenda is to focus on the ease of right exposure. Here are some significant reasons that claim that using Auto ISO is beneficial to pro-leveled filming
- It allows the user to concentrate on other different tasks
- It offers you stability in the lighting condition throughout the shoot.
- It grants you the power to master the composition and focus
- It provides convenience by cutting out the additional task of adjusting ISO
- Auto ISO is great for capturing the action or spontaneous moments
- It can get you the better and desired depth of field as needed.
When to use Auto ISO during filming?
Auto ISO is absolutely among one of the greatest features the modern revolutionary photography world has introduced. This is extremely useful for shooting during numerous scenarios and circumstances.
It not only enhances the better exposure stability but also saves you time and effort. Ideally, they are fruitful to be used when the light in the scene is rapidly changing and you don’t have the time to catch a fast-paced situation like that.
There are few photography styles that can use the competency of Auto ISO.
- Sport photography
- Action photography
- Wildlife photography
- Event photography
- Lifestyle or family photography
- Concert or carnivals photography
- Fireworks or parties’ photography
- Street Photography
Using Auto ISO in a different mode
As we mentioned, you can use the unrivaled potential of Auto ISO in different shooting modes offered by traditional and new digital cameras. This Auto ISO work is done through this mode in a certain way.
Shutter Priority Mode – In the shutter priority mode, the user has the freedom of setting the shutter speed on its own while the aperture is evaluated by the camera itself. With the sudden change in the lighting level, the aperture immediately responds to correct the exposure level. If the exposure level falls beyond the aperture range, the Auto ISO steps in and turns to increase the sensitivity value by altering the ISO.
Aperture Priority Mode – Similarly, in the aperture priority mode, the photographers get to choose the aperture level, while the shutter speed value moderation is left as the camera’s duties. Like the shutter priority mode, when the lighting amount changes in the images, the shutter speed changes according to the correct exposure standard, but when the shutter speed range falls out beyond, the Auto ISO works and increases the sensitive value.
Manual Mode – Auto ISO in manual mode justifies that the aperture and shutter speed values are entered by the user, while the ISO range will be configured and altered by Auto ISO; it will increase or decrease the ISO value to maintain the consistency of better exposure in the image. Remember, while using Auto ISO in manual mode, the correct shutter speed, and aperture setting will be displayed on the electronic analog to enter manually.
Program Mode – The program mode states that the aperture and shutter speed values are set by the camera self. When the lighting amount changes in the image, the camera modifies the shutter speed and aperture value to match the exposure standard. But when the values go beyond the range, Auto ISO enters and manages the sensitivity by adjusting ISO.
How to set Auto ISO for your camera?
Remember, Auto ISO can be beneficial in the photography game if it’s been used correctly, following a relevant series of steps. The following steps will guide you to choose the Auto ISO setting carefully and result in better.
Step 1 – Find your camera manual and look for the Auto ISO configuration settings under the menu section with detailed instructions.
Step 2 – Choose a unique shutter speed and aperture for your camera, as tuning in Auto ISO doesn’t specify an overall auto mode.
Step 3 – For the whole Auto ISO initiation, you will be going to inform the camera of the maximum ISO range and the lower ISO range so that it would be set as a limit. (you can choose the native ISO Available for the lowest range)
Step 4 – Now, if you are shooting full manual, you can opt for the metering mode, which controls how your camera chooses the ISO value.
Step 5 – Afterwards, you can take the help of the exposure compensation to identify whether your image is underexposed or overexposed to the light. This can be simply done by turning the exposure compensation dial.
Step 6 – Once you are done with the basic settings, it’s time to take the shot and review. Sometimes you just aren’t satisfied with the result or agree with the value; in that case, repeat the steps after modifying the max and min ISO values set by you.
When to not use Auto ISO?
Even though Auto ISO is considered highly beneficial to manage balanced brightness in the shot, there are a few circumstances that don’t tolerate or need the involvement of Auto ISO.
There might be a condition where you don’t need Auto ISO, or it just doesn’t serve you well. They will affect the picture quality, ease, and sometimes workflow of filming. The situation when Auto ISO can be avoided are
- Shooting slow and deliberately smoothest shot, in such a case, you will need complete control, and you cannot afford automaticity.
- Shooting with the tripod or the camera stabilizer, throughout such shot lighting levels generally remains the same, which eliminates the requirement of Auto ISO.
- Shooting a scene where your subject is moving with constant lighting, but the background is different; this states that the camera adjusts the exposure when the background moves the constant brightness will be required on the subject.
- Shooting with the camera’s flash, or when your flash won’t work relevantly or the day it should, one shouldn’t use Auto ISO in such a case.
- Shooting with artificial lighting, when you control the lighting other than shooting with existing lighting.
- Auto ISO can be avoided while shooting the highly brightest scenario; you can just pick the ISO value to the lowest, and the shutter speed and adequate aperture setting will automatically come along.
Summing Up!
Auto ISO has proven its worth to creative photographers by enhancing their artistic aspect of filming and reducing their effort of changing the setting to almost every moment.
With better control over shutter speed and aperture, you can sufficiently get all these settings in the Auto ISO setting, which you have concluded. There might be some debate over its drawbacks, which also secure a significant part of the article.
So now you know what it is and how it benefits the filming, along with why and when it shouldn’t be used, pointing out that it’s all about your choice.
Everything you need to know about Auto ISO has come right to your fingertip: Here. So how does it feel to be a master of Auto ISO, do not forget to tell us in the comment section below.